Brake Maintenance: Signs of Wear, Inspection Tips, and DIY Replacement
Brakes are one of the most critical components of your vehicle's safety system. Regular brake maintenance is essential for ensuring that your car stops effectively and safely. Whether you're a seasoned DIY mechanic or a car owner looking to understand more about brake care, knowing how to identify signs of wear, perform inspections, and carry out basic replacements can save you time and money. This guide will walk you through everything you need to know about brake maintenance.
Recognizing Signs of Brake Wear
Squeaking or Squealing Noises
-
Cause: Squeaking or squealing noises usually indicate that your brake pads are worn and need replacing. Most brake pads have built-in wear indicators that create noise when the pad material is low.
-
Action: If you hear these noises, schedule an inspection soon to prevent damage to your rotors and maintain safe braking performance.
Grinding Sounds
-
Cause: Grinding noises suggest that your brake pads are severely worn, and the metal backing plate is coming into contact with the rotor. This can cause significant damage to both the pads and rotors.
-
Action: If you hear grinding sounds, stop driving and have your brakes inspected and repaired immediately to avoid further damage and ensure safety.
Vibration or Pulsation
-
Cause: A pulsating or vibrating brake pedal can be a sign of warped brake rotors. This often results from excessive heat buildup or uneven wear.
-
Action: Have your rotors inspected and resurfaced or replaced as needed to restore smooth braking performance.
Soft or Spongy Brake Pedal
-
Cause: A soft or spongy brake pedal often indicates air in the brake lines or a problem with the brake fluid. This can affect braking efficiency and safety.
-
Action: Check the brake fluid level and look for leaks. If the pedal remains soft after topping up the fluid, have the brake system inspected for potential air in the lines or other issues.
Warning Lights
-
Cause: Modern vehicles often have dashboard warning lights for brake issues, such as the brake warning light or the ABS (Anti-lock Braking System) light.
-
Action: When these lights illuminate, consult your vehicle’s owner’s manual and seek professional diagnosis and repair.
Brake Inspection Tips
Checking Brake Pads
-
Visual Inspection: Look through the wheel spokes to see the brake pads. They should be at least 1/4 inch thick. If they appear thinner, it’s time to replace them.
-
Wear Indicator: Many vehicles have a wear indicator on the brake pads that emits a squealing noise when the pads are worn down.
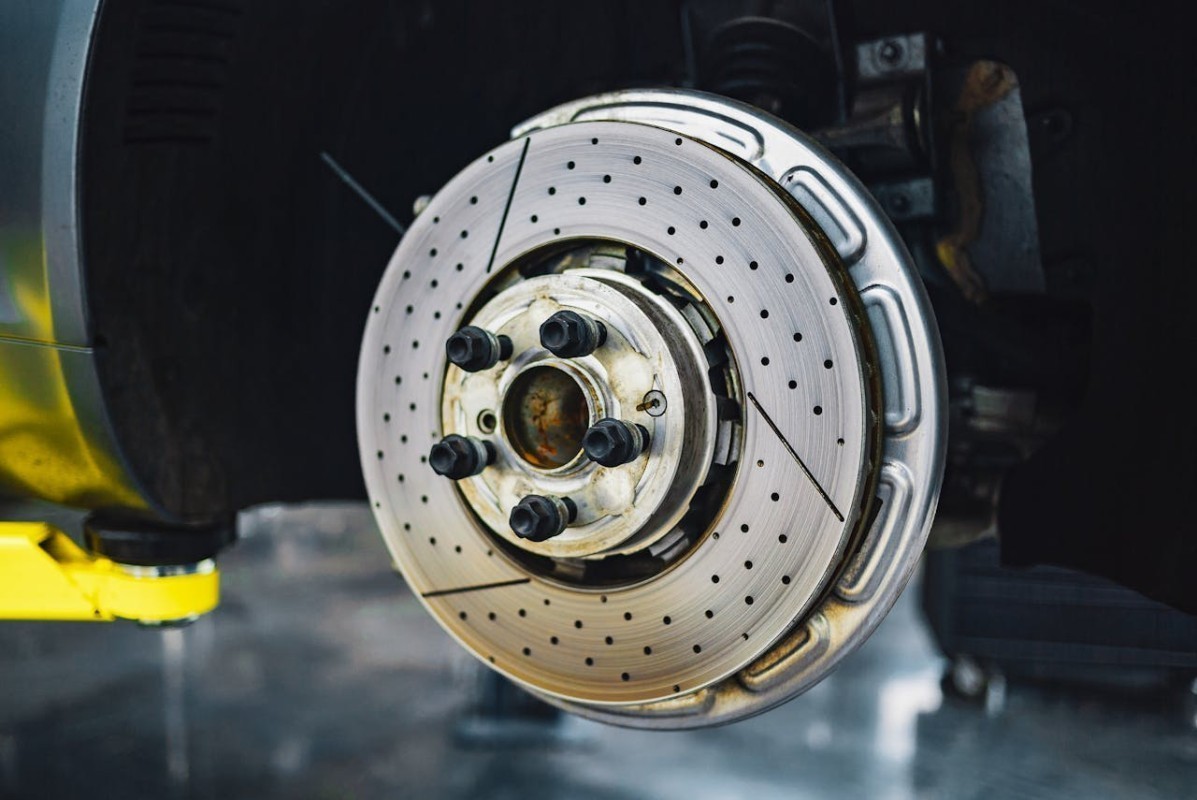
Inspecting Brake Rotors
-
Visual Check: Examine the rotors for grooves, cracks, or scoring. Rotors should have a smooth surface. Deep grooves or significant damage indicate that they need to be resurfaced or replaced.
-
Thickness Measurement: Use a micrometer to measure the rotor thickness. Compare it to the manufacturer’s specifications. Rotors that are below the minimum thickness should be replaced.
Checking Brake Fluid
-
Fluid Level: Check the brake fluid reservoir located near the back of the engine bay. Ensure the fluid level is between the “MIN” and “MAX” marks.
-
Fluid Condition: Brake fluid should be clear or slightly amber. If it appears dark or contaminated, it may need to be flushed and replaced.
Examining Brake Lines and Hoses
-
Visual Inspection: Check for signs of wear, leaks, or cracks in the brake lines and hoses. Damaged lines or hoses can lead to brake fluid loss and reduced braking performance.
-
Feel and Listen: Inspect brake lines for any noticeable bulging or soft spots. Look for any puddles of brake fluid under the vehicle.
DIY Brake Replacement
Gathering Tools and Supplies
-
Tools Needed: Socket set, wrench set, brake fluid, jack and jack stands, lug wrench, and brake caliper tool.
-
Replacement Parts: New brake pads, brake rotors (if needed), and possibly new brake fluid.
Steps for Replacing Brake Pads
-
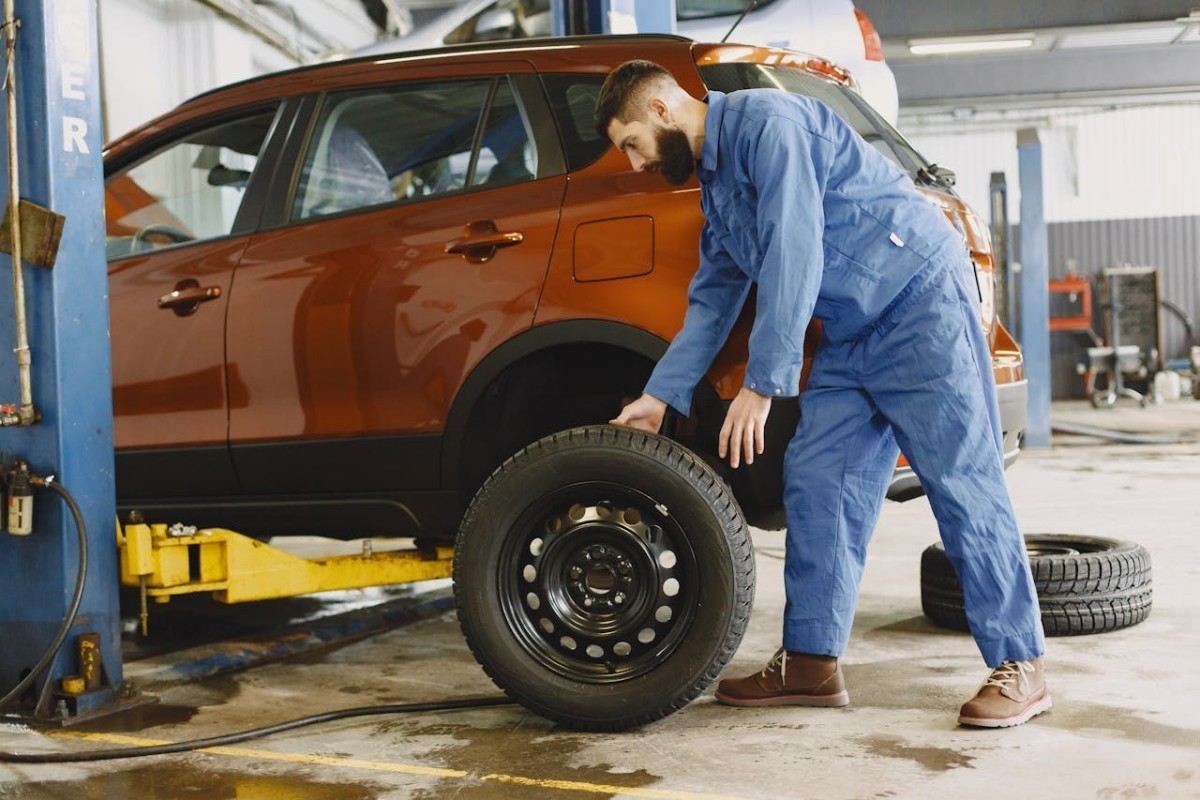
Lift the Vehicle: Use a jack to lift the vehicle and secure it with jack stands. Remove the wheel to access the brake components.
-
Remove the Caliper: Unbolt and remove the caliper. Be careful not to damage the brake line. Secure the caliper with a piece of wire or string to avoid stressing the brake line.
-
Replace the Pads: Remove the old brake pads from the caliper bracket. Install the new pads, ensuring they are properly aligned.
-
Reassemble: Reattach the caliper, ensuring all bolts are tightened to the manufacturer’s specifications. Replace the wheel and lower the vehicle.
-
Check and Test: Pump the brake pedal to ensure the pads seat correctly and check the brake fluid level. Test drive the vehicle at low speeds to ensure proper braking performance.
Steps for Replacing Brake Rotors
-
Remove the Old Rotors: Follow the same initial steps as replacing brake pads. Unbolt and remove the caliper and brake pads. Remove any retaining screws or clips holding the rotors in place.
-
Install New Rotors: Place the new rotors onto the wheel hub. Ensure they are properly seated and secured with retaining screws if applicable.
-
Reassemble: Reinstall the brake pads and caliper. Tighten all bolts to the manufacturer’s specifications. Replace the wheel and lower the vehicle.
-
Check and Test: Ensure the brake system is functioning correctly by checking the brake pedal feel and performing a test drive.
When to Seek Professional Help
Complex Issues
-
Advanced Repairs: If you encounter complex issues, such as ABS problems or significant brake system malfunctions, it’s best to consult a professional mechanic.
-
Specialized Equipment: Professional mechanics have specialized tools and equipment for precise repairs and diagnostics.
Safety Considerations
-
Ensure Safety: Proper brake maintenance is crucial for vehicle safety. If you’re unsure about any aspect of brake repairs, seeking professional assistance ensures that the job is done correctly and safely.


Regular brake maintenance is crucial for ensuring the safety and performance of your vehicle. By recognizing signs of wear, performing routine inspections, and understanding how to carry out basic DIY replacements, you can keep your braking system in top condition. Always prioritize safety and consult a professional for complex issues or if you’re uncertain about performing repairs. Maintaining your brakes not only enhances your driving experience but also ensures your safety on the road.
Was This Article Helpful?
Click on a star to rate it!
Thank you for your vote!

Average Rating: 5/5 Votes: 39
Be the first to rate this post!

Latest Posts

The Role of Animal Shelters in Communities

Renewable Energy and Sustainable Development